Mod #2 - Rear Crash Bars
- jescka086
- Jun 6, 2017
- 4 min read

Rear crash bars are basically cowl protectors, designed to take the initial hit from a tip-over and protect the cowls – a pricey part to repair or replace on a Vespa, and unfortunately the most likely place to get damaged in a drop. I don’t intend to drop or crash the scoot anytime soon, but you never know. With the GT200 on the kickstand, a few meddlesome kids or a really strong wind at just the right angle could knock it right over. One of the nice things about starting out with a scoot that’s already ten years old is that it already has some scratches and repainted areas on the cowls, so I’m not stressed about ruining anything really. The crash bars will hopefully just keep it from getting worse in the event of any other times when the cowl meets the ground.
I told myself that my first scooter mods were all going to be in the name of safety, nothing cosmetic for awhile. I want to do a ton of things that all cost money, so this seemed like a smart way to prioritize. But this deal was too good to pass up: Prima crash bars normally retail for over $100, but I found them in the garage sale section of Scooterworks’ website (registered users only!) for $36. That’s ridiculous. Sold.
I opened the package from Scooterworks and this is what was inside. Notice anything missing?


On the product page on Scooterworks’ website, I found a link to instructions. Jackpot! Except – the instructions were for Faco brand crash bars, and for a GTS Vespa, not a GT. Similar brand, similar model, but were these the ones I needed? The company’s live chat person checked it out for me pretty quickly and determined that yes, these instructions were correct for my product.
Too bad they were mostly in Italian, and the English translation next to the terrible diagrams that looked like they had been mimeographed was mostly useless. I had no idea what tools I would need, even.
Still, I went outside and gave it a shot. I’ll spare you the story of my tedious trial and error process got and instead tell you how you can do this a lot faster than I did.
The Install:
Gather your supplies. You’ll need a Phillips-head screwdriver (handheld is fine, drill is better), a 1/2″ wrench or socket, a #5 hex wrench, a #6 hex wrench, and a couple of small hose clamps or heavy-duty zip ties. Make sure you get the ones that can handle high heat.
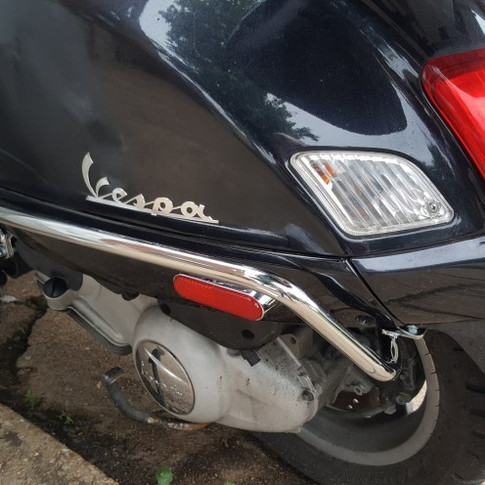
Pick a side and remove the lower rear fairing under the cowl, the piece with the reflector. There should be two Phillips-head screws holding it in; the rest should pop off if you pry gently.
Now remove the two Phillips-head chassis screws from the body of the scooter, located right near the screws you removed to take off the fairing. Nothing will come off when you remove these (if it does, call someone who knows more than I do), but you’ll use them to hold your crash bar brackets in place. Keep track of which screw goes where.
My lousy instructions indicated that I should first mount the brackets, then add the crash bar to the brackets after replacing the fairing. I found this really difficult because I couldn’t maneuver my tools well enough to tighten the self-locking nuts with so little ground clearance. If you have your bike up on a stand this would work, but if not, you can try it my way.
Affix the brackets to the crash bar. It doesn’t really matter what screw you use where – all the holes are the same size. Just use this assembly – screw, washer, bracket, locking washer, self-locking nut – and you’ll be fine. Check out the photos below to see which is front and which is back and how they fit.
Attach the front bracket to the scooter, using the chassis screw you removed in Step 3. (If you are working on the driver’s right, the side with your exhaust, see below for an important note)
Wedge the fairing piece back in between the crash bar and the scooter – you won’t have enough clearance to do this if you fully install the bar first, so do it now. Don’t pop it into place, just get it behind the bar.
Use the last chassis screw to attach the back bracket to the scooter frame.
Wiggle the fairing back into position, pop it into place and replace the fairing screws.
Give the brackets one last crank with the wrench to make sure everything is secure.


This is what they look like fully installed:


Now for the special caveat for the right-hand side. The front bracket does not have enough clearance to install without making a significant surface connection with your radiator tubing – definitely not safe. One installation review I dug up on ModernVespa showed the guy bending the steel bracket in a table vise. I have no table vise, nor any other way to bend a chunk of steel like that, so I went with another proposed fix: zip ties. A few strategically placed high-heat ties pulled the tubing back just enough that I could get the bracket in place with a little clearance to spare. When you’re screwing in the front bracket, line it up and gently pull the bracket away from the tubing as you tighten the screw.
UPDATE 5/19/18: I do not recommend the zip tie fix. I ended up with a leaky coolant hose. Click here to read more about that. Find a way to bend the bracket instead.
Finally ready to ride!


Finally ready to ride!
They don’t add a ton of width and look really slick without being obtrusive. I like ’em.
To read The Loopy Scooterist's conclusion, her parting thoughts and see the finished product, head over to her blog HERE.


Comments